To begin with, you need access to an instance of OpenSSL. The OpenSSL Project is a collaborative effort to develop a robust, commercial-grade, full-featured, and Open Source toolkit implementing the Secure Sockets Layer (SSL v2/v3) and Transport Layer Security (TLS v1) protocols as well as a full-strength general purpose cryptography library. It can be used to create self-signed certificates at no cost. Many Linux distributions come with pre-compiled OpenSSL packages, if you have a favourite, go with that!
I didn’t have access to a linux distro, so choose to install and fire up a virtual instance of Ubuntu Desktop (ubuntu-10.04.1-desktop-amd64.iso),using a copy of VMWare server I had installed locally on my laptop. It only takes a few minutes to install, and can be shutdown again afterwards.
Once you are in your chosen Linux distro, drop to a console/command prompt.

Launch your instance of Ubuntu and drop to a terminal prompt
Once you have a terminal session open, create yourself a working folder and CD into it.
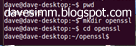
We can then generate the SSL’s using the following commands
openssl genrsa 1024 > host.key
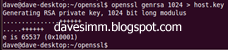
openssl req -new -x509 -nodes -sha1 -days 365 -key host.key > host.cert
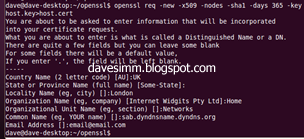
After running the req –new command you will be prompted to enter required information. Most isn’t mandatory; the only one you really need to get right is the Common Name. It is important to note, whatever common name you choose for your certificate, must match the public dns record or hostfile entry you are using to access your instance on from the internet.
For example: If you create your certificate with a common name of “sabinstance.davesimm.com” but you then access that instance at http://89.23.233.51/sab the certificate will fail as the names do not match. The easiest way to ensure the names on your certificate match is either to utilise a static IP and your own domain name, or use a dynamic DNS service such a dyndns.com. You would then match the certificate name to your chosen dyndns record.
Extract the .key and .cert files from your Ubuntu/openssl instance and copy them to whatever machine is running Sabnzbd. An easy way to do this is run “view host.key” / “view host.cert” and just clipboard copy the information to a txt file on your host machine.
Copy the 2 files into the correct location for Sabnzbd files depending on which OS you are running.
WinXP:
%localappdata%/sabnzbd/admin/server.cert
%localappdata%/sabnzbd/admin/server.key
Linux:
~/.sabnzbd/admin/server.cert
~/.sabnzbd/admin/server.key
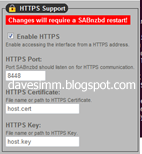
Depending on your current setup you may need to select the certificate files in Sab, enable HTTPS, and choose your SSL port.
At this point, remember, your certifcates haven’t been issued by a public trusted certificate authority, such as Verisign or Geotrust. This means that any machine or device you use to access your sab instance will not trust your SSL certificate. You can work around this by installing the certificate into any remote machines “trusted root authority” certificate store. I have also installed my certificate into the certificate store of my Windows Mobile 7 phone to enable secure encrypted connection from my handset. I will cover both below.
To install your certificate in windows XP / Windows 7 do the following.
Click start/run
Type MMC
File Add/Remove snap in
Choose Certificaes
Click Add
Click Computer Account
Click Next
Click Local Computer
Click Finish
Click OK
Expand the certificate management console and expand the Trusted Root Certificate Authorities folder.
Right click, choose all tasks and chose import. Browse to your host.cer file and import.
To install the SSL certificate on your WP7 device do the following
There are a few documented ways to install SSL certificates on WP7 devices, the easiest way I found was the email method. Take the host.cert file we created earlier, rename it to host.cer and email it to yourself on an email address you can retrieve on the WP7 device. When the email arrives, open the attachment and follow the onscreen prompts to install the certificate.
When you attempt to access your instance on the common name you specified earlier, you should have an error free encrypted connection to your instance.
