Eagerly awaited to fix multiple client and server issues. Mostly around integration with EWS (out of office, visual voicemail etc)
Client KB
Server KB
Core Components KB
WP7 March Update
I've just installed the March 2011 WP7 update to my HTC Trophy, and am now graced with copy & paste functionality. It's good to see Microsoft acting on the feedback from customers. Below is the official list of additional features.
March 2011
OS version: 7.0.7390.0*
- •Copy & paste. You asked for it—now it's here. Just tap a word and drag the arrows to copy and paste it on your phone. You can copy text from emails, text messages, web pages, and Office Mobile documents, and paste it anywhere you can type. To learn more, see Copy & paste.
- •Faster apps and games. Nobody likes to wait. That's why we've whittled down the time it takes for apps and games to start up and resume. It's all part of our focus on getting you to the things you love, easier and faster.
- •Better Marketplace search. We've streamlined Marketplace search to make it easier to find specific apps, games, or music. Press the Search button in the Apps or Games section of Marketplace and you'll see only apps or games in the results. Press Search in the Music section of Marketplace to search just the music catalog.
- •Other Marketplace improvements. We've improved the stability of Marketplace while you download apps. We've also improved the experience of downloading apps larger than 20 megabytes, upgrading from trial apps to paid apps, sharing links to apps via email, sorting Xbox LIVE games by release date, and creating an Xbox LIVE account from within the Games Hub.
- •Wi-Fi improvements. We now display your phone's Media Access Control (MAC) address in Settings. (You might need this info if you try to connect to a Wi-Fi network that uses MAC address filtering. To learn more, see Connect to a Wi-Fi network.) We've also removed the limit on the number of Wi-Fi profiles that you can store and reduced the time it takes to start your phone if you've stored lots of Wi-Fi profiles.
- •Outlook improvements. We've improved the experience of viewing iPhone photo attachments you receive from a non-Exchange-based email account (such as a Google Mail, Hotmail, or Yahoo! Mail account), using the Global Address List (GAL) when connecting to Exchange Server 2003 using Exchange ActiveSync, and working with email display names that contain brackets (for example, "David Alexander [Contoso]").
- •Facebook integration. We've improved the experience of syncing Facebook accounts.
- •Camera improvements. We've improved the stability of switching between camera and video modes.
- •Audio improvements. We've improved the experience of using a Bluetooth headset to make calls when you're playing music or videos.
- •Other performance improvements. This month's update also includes software from several phone manufacturers that improves the performance of specific models. Naturally, if you don't have one of the affected models, we won't install this portion of the update on your phone.
April 2011 Lync Updates
April 2011 Lync updates have today been made available. Details are below.
Lync 2010 (64bit) | ||
Lync 2010 (32bit) | ||
Lync 2010 Phone Edition (Tanjay) | ||
Lync 2010 Phone Edition (Aries-Aastra) | ||
Lync 2010 Phone Edition (Aries-Polycom) | ||
Lync 2010 Attendee (Admin Install) | ||
Lync 2010 Attendee (User mode install) | ||
Lync 2010 Attendant (32 & 64 bit are a combined patch) | ||
Lync 2010 Group Chat Client | ||
Lync 2010 Group Chat Server | ||
Lync 2010 Group Chat Admin |
Some links are still working their way through the system and will become available within a week from today.
Some of the KBs are still in process. These should be available by 4/8.
Additional Notes:
Lync Client and Group Chat build number is 4.0.7577.253
Lync Attendee/Attendant build number is 4.0.7577.254
The Phone Editions build number is 4.0.7577.250
Server patches will be available soon.
Both client and server patches will tentatively be available on Microsoft Update the second Tuesday of May.
BES 5 Service Pack 3
RIM have now released BES 5 SP3, which includes native functionality for OCS and Lync. This means there is no longer the requirement to install an OCS 2007 R1 CWA server to achieve connectivity with a Blackberry handset.
http://swdownloads.blackberry.com/Downloads/entry.do
http://docs.blackberry.com/en/
http://swdownloads.blackberry.com/Downloads/entry.do
http://docs.blackberry.com/en/
Using OpenSSL to secure and encrypt your SabNZBd server traffic with self signed certificates
If you are planning on (or already have) externally published your SabNZBd server, it’s a good idea to implement SSL certificates to securely encrypt traffic going in and out of your network. This will prevent any overzealous network admins, or even your ISP from snooping on your traffic and seeing what you are downloading. It also makes sure things like your username and password aren’t sent in plain text traffic over network devices you aren’t in control of.
To begin with, you need access to an instance of OpenSSL. The OpenSSL Project is a collaborative effort to develop a robust, commercial-grade, full-featured, and Open Source toolkit implementing the Secure Sockets Layer (SSL v2/v3) and Transport Layer Security (TLS v1) protocols as well as a full-strength general purpose cryptography library. It can be used to create self-signed certificates at no cost. Many Linux distributions come with pre-compiled OpenSSL packages, if you have a favourite, go with that!
I didn’t have access to a linux distro, so choose to install and fire up a virtual instance of Ubuntu Desktop (ubuntu-10.04.1-desktop-amd64.iso),using a copy of VMWare server I had installed locally on my laptop. It only takes a few minutes to install, and can be shutdown again afterwards.
Once you are in your chosen Linux distro, drop to a console/command prompt.
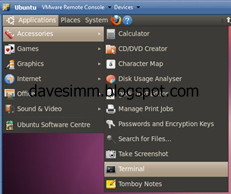
Launch your instance of Ubuntu and drop to a terminal prompt
Once you have a terminal session open, create yourself a working folder and CD into it.

We can then generate the SSL’s using the following commands
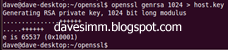
openssl genrsa 1024 > host.key
openssl req -new -x509 -nodes -sha1 -days 365 -key host.key > host.cert
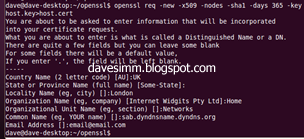
After running the req –new command you will be prompted to enter required information. Most isn’t mandatory; the only one you really need to get right is the Common Name. It is important to note, whatever common name you choose for your certificate, must match the public dns record or hostfile entry you are using to access your instance on from the internet.
For example: If you create your certificate with a common name of “sabinstance.davesimm.com” but you then access that instance at http://89.23.233.51/sab the certificate will fail as the names do not match. The easiest way to ensure the names on your certificate match is either to utilise a static IP and your own domain name, or use a dynamic DNS service such a dyndns.com. You would then match the certificate name to your chosen dyndns record.
Extract the .key and .cert files from your Ubuntu/openssl instance and copy them to whatever machine is running Sabnzbd. An easy way to do this is run “view host.key” / “view host.cert” and just clipboard copy the information to a txt file on your host machine.
Copy the 2 files into the correct location for Sabnzbd files depending on which OS you are running.
WinXP:
%localappdata%/sabnzbd/admin/server.cert
%localappdata%/sabnzbd/admin/server.key
Linux:
~/.sabnzbd/admin/server.cert
~/.sabnzbd/admin/server.key
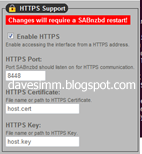
Depending on your current setup you may need to select the certificate files in Sab, enable HTTPS, and choose your SSL port.
At this point, remember, your certifcates haven’t been issued by a public trusted certificate authority, such as Verisign or Geotrust. This means that any machine or device you use to access your sab instance will not trust your SSL certificate. You can work around this by installing the certificate into any remote machines “trusted root authority” certificate store. I have also installed my certificate into the certificate store of my Windows Mobile 7 phone to enable secure encrypted connection from my handset. I will cover both below.
To install your certificate in windows XP / Windows 7 do the following.
Click start/run
Type MMC
File Add/Remove snap in
Choose Certificaes
Click Add
Click Computer Account
Click Next
Click Local Computer
Click Finish
Click OK
Expand the certificate management console and expand the Trusted Root Certificate Authorities folder.
Right click, choose all tasks and chose import. Browse to your host.cer file and import.
To install the SSL certificate on your WP7 device do the following
There are a few documented ways to install SSL certificates on WP7 devices, the easiest way I found was the email method. Take the host.cert file we created earlier, rename it to host.cer and email it to yourself on an email address you can retrieve on the WP7 device. When the email arrives, open the attachment and follow the onscreen prompts to install the certificate.
When you attempt to access your instance on the common name you specified earlier, you should have an error free encrypted connection to your instance.
To begin with, you need access to an instance of OpenSSL. The OpenSSL Project is a collaborative effort to develop a robust, commercial-grade, full-featured, and Open Source toolkit implementing the Secure Sockets Layer (SSL v2/v3) and Transport Layer Security (TLS v1) protocols as well as a full-strength general purpose cryptography library. It can be used to create self-signed certificates at no cost. Many Linux distributions come with pre-compiled OpenSSL packages, if you have a favourite, go with that!
I didn’t have access to a linux distro, so choose to install and fire up a virtual instance of Ubuntu Desktop (ubuntu-10.04.1-desktop-amd64.iso),using a copy of VMWare server I had installed locally on my laptop. It only takes a few minutes to install, and can be shutdown again afterwards.
Once you are in your chosen Linux distro, drop to a console/command prompt.
Launch your instance of Ubuntu and drop to a terminal prompt
Once you have a terminal session open, create yourself a working folder and CD into it.
We can then generate the SSL’s using the following commands
openssl genrsa 1024 > host.key
openssl req -new -x509 -nodes -sha1 -days 365 -key host.key > host.cert
After running the req –new command you will be prompted to enter required information. Most isn’t mandatory; the only one you really need to get right is the Common Name. It is important to note, whatever common name you choose for your certificate, must match the public dns record or hostfile entry you are using to access your instance on from the internet.
For example: If you create your certificate with a common name of “sabinstance.davesimm.com” but you then access that instance at http://89.23.233.51/sab the certificate will fail as the names do not match. The easiest way to ensure the names on your certificate match is either to utilise a static IP and your own domain name, or use a dynamic DNS service such a dyndns.com. You would then match the certificate name to your chosen dyndns record.
Extract the .key and .cert files from your Ubuntu/openssl instance and copy them to whatever machine is running Sabnzbd. An easy way to do this is run “view host.key” / “view host.cert” and just clipboard copy the information to a txt file on your host machine.
Copy the 2 files into the correct location for Sabnzbd files depending on which OS you are running.
WinXP:
%localappdata%/sabnzbd/admin/server.cert
%localappdata%/sabnzbd/admin/server.key
Linux:
~/.sabnzbd/admin/server.cert
~/.sabnzbd/admin/server.key
Depending on your current setup you may need to select the certificate files in Sab, enable HTTPS, and choose your SSL port.
At this point, remember, your certifcates haven’t been issued by a public trusted certificate authority, such as Verisign or Geotrust. This means that any machine or device you use to access your sab instance will not trust your SSL certificate. You can work around this by installing the certificate into any remote machines “trusted root authority” certificate store. I have also installed my certificate into the certificate store of my Windows Mobile 7 phone to enable secure encrypted connection from my handset. I will cover both below.
To install your certificate in windows XP / Windows 7 do the following.
Click start/run
Type MMC
File Add/Remove snap in
Choose Certificaes
Click Add
Click Computer Account
Click Next
Click Local Computer
Click Finish
Click OK
Expand the certificate management console and expand the Trusted Root Certificate Authorities folder.
Right click, choose all tasks and chose import. Browse to your host.cer file and import.
To install the SSL certificate on your WP7 device do the following
There are a few documented ways to install SSL certificates on WP7 devices, the easiest way I found was the email method. Take the host.cert file we created earlier, rename it to host.cer and email it to yourself on an email address you can retrieve on the WP7 device. When the email arrives, open the attachment and follow the onscreen prompts to install the certificate.
When you attempt to access your instance on the common name you specified earlier, you should have an error free encrypted connection to your instance.

Lync enabling or making Lync changes to a user who is or was a member of the Domain Admins security group
There are already a number of forums posts floating around on this, but it’s something I found out about the hard way, so i’ll blog it in the hope it helps someone else out.
While attempting to make a change to my own Lync user (on a sandpit development environment I’d like to add!) I was presented with the following operation failed error...

Active Directory operation failed on. You cannot retry this operation: “Insufficient access rights to perform the operation 00002098: SccErr: DSID-03150BB9, problem 4003 (INSUFF_ACCESS RIGHTS), data O”.
You do not have the appropriate permissions to perform this operation in Active Directory. One possible cause Is that the Lync Server Control Panel and Remote Windows PowerShell cannot modify users who belong to protected security groups (for example, the Domain Admins group). To manage users In the Domain Admins group, use the Lyric Server Management Shell and log on using a Domain Admins account. There are other possible causes. For details, see Lync Server 2010 Help.
I also found the following errors in the application event log...
Login failed for user 'OS\Dave.Simm'. Reason: Failed to open the explicitly specified database. [CLIENT: 89.31.238.2]
At this point it’s convenient to mention that I was going against all best practise and Microsoft security models known to man. This is a sandpit/development Lync environment with no other products installed and with only a handful of IT users on it. What had I done that was against best practise? I had added my own everyday Lync sip enabled user into the Domain Admins and CSAdministrators group. Any active directory administrator worth their salt will frown heavily upon this. Admins/Engineers should always have 2 accounts, a normal everyday user account, for Lync, Exchange, Sharepoint, and an admin account with escalated privileges to run admin procedures with.
So, realising the error of my ways, and being pointed in the right direction by the fairly helpful error messages. I took my account out of the Domain Admins group, logged out, and back in using my LyncAdmin user. This user isn’t Lync enabled and is purely an admin account. Only to hit exactly the same issue.
Adding a user account into the Domain Admins group makes changes to the way advanced security permissions are propagated and inherited by a user account. In order to reverse these changes you have to re-inherit these permissions. From dsa.msc (Active Directory Users & Computers) make sure that you are viewing advanced features; from the view menu select Advanced Features.

Find the user in question, edit the users properties, click the security tab, then click advanced. You need to tick the “Include inheritable permissions from this object’s parent” tick box to re propagate the required permissions.

Retry any Lync user changes and this time they should be successful.
While attempting to make a change to my own Lync user (on a sandpit development environment I’d like to add!) I was presented with the following operation failed error...

Active Directory operation failed on
You do not have the appropriate permissions to perform this operation in Active Directory. One possible cause Is that the Lync Server Control Panel and Remote Windows PowerShell cannot modify users who belong to protected security groups (for example, the Domain Admins group). To manage users In the Domain Admins group, use the Lyric Server Management Shell and log on using a Domain Admins account. There are other possible causes. For details, see Lync Server 2010 Help.
I also found the following errors in the application event log...
Login failed for user 'OS\Dave.Simm'. Reason: Failed to open the explicitly specified database. [CLIENT: 89.31.238.2]
At this point it’s convenient to mention that I was going against all best practise and Microsoft security models known to man. This is a sandpit/development Lync environment with no other products installed and with only a handful of IT users on it. What had I done that was against best practise? I had added my own everyday Lync sip enabled user into the Domain Admins and CSAdministrators group. Any active directory administrator worth their salt will frown heavily upon this. Admins/Engineers should always have 2 accounts, a normal everyday user account, for Lync, Exchange, Sharepoint, and an admin account with escalated privileges to run admin procedures with.
So, realising the error of my ways, and being pointed in the right direction by the fairly helpful error messages. I took my account out of the Domain Admins group, logged out, and back in using my LyncAdmin user. This user isn’t Lync enabled and is purely an admin account. Only to hit exactly the same issue.
Adding a user account into the Domain Admins group makes changes to the way advanced security permissions are propagated and inherited by a user account. In order to reverse these changes you have to re-inherit these permissions. From dsa.msc (Active Directory Users & Computers) make sure that you are viewing advanced features; from the view menu select Advanced Features.

Find the user in question, edit the users properties, click the security tab, then click advanced. You need to tick the “Include inheritable permissions from this object’s parent” tick box to re propagate the required permissions.

Retry any Lync user changes and this time they should be successful.
Wigan Warriors Fixtures iCalendar 2011 Season
 I took it upon myself to create a Wigan Warriors 2011 iCalendar fixture list. this is importable into Outlook/Gmail/Hotmail and a host of other calendars. Information is upto date at time of publishing. If any fixtures are changed i will update as soon as possible. Hope this helps a few people out.
Download the calendar here
Subscribe to:
Posts (Atom)